 The type of structure or method you choose to make compost is really a matter of personal preference. If you are the do-it-yourself type, you may want to build your own structure using materials like wood, welded wire, concrete blocks or wooden pallets. Pre-fabricated ready-built bins and drum turning units are also available from local building supply stores and garden centers or through mail-order catalogs. Many manufactured bins are being made from recycled plastic. If aesthetics are of concern, you may want to purchase a manufactured bin.
On the other hand, home composting does not have to be done in a structure. It can be done simply by placing organic materials in a pile or heap in the backyard. It can also be done in a pit dug in the ground or simply in plastic bags in the backyard. Still another indirect way of composting is simply to incorporate organic matter, like fall leaves and declining annual plants, into garden soil just like farmers do at the end of a cropping season.
In this chapter, we’ll discuss five methods of composting using a wide variety of structures: holding units, turning units, heaps, pit composting, and plastic bag composting. Specific plans are also provided for a wide variety of structures.
Holding Units
Holding units are containers, bins or structures for holding organic materials in place during the composting process. Portable units may be made from light-weight materials, such as welded wire or hardware cloth, chicken wire on a wood frame, or old wooden pallets tied together, while permanent units can be madefrom landscape timbers, concrete blocks or bricks.
Manufactured holding units are also available. Holding units differ from turning units in that organic materials within holding units are usually not turned while turning units are built to make turning easy.
Regardless of the type of structure you choose, make certain it is well-ventilated for good air circulation throughout the composting materials. Also, the ideal size for the structure is 3 ft. X 3 ft. X 3 ft. If the bin is higher or wider than 3 feet, aeration becomes a problem and the composting process occurs more slowly.
The following are do-it-yourself instructions for building some of the commonly used holding units. Feel free to modify the plans to best fit your purpose.
Wire-mesh Holding Unit

A wire-mesh holding unit is one of the most inexpensive and easiest unitsto build. It can be made from galvanized chicken wire (ungalvanized wire will not last long) or hardware cloth. The wire-mesh bin also provides for easy turning of the organic materials. Simply lift the wire, set it to the side, and use a garden fork or shovel to scoop the organics back into the pile while harvesting finished compost from the bottom.
Materials
- 10-foot length of 36-inch-wide 1-inchgalvanized chicken wire or 10-foot length of 1/2-inch-wide hardware cloth
- heavy wire for ties
- three or four 4-foot tall wooden or metal posts (for chicken wire bin)
Tools
- Heavy-duty wire or tin snips
- Pliers
- Hammer (for chicken wire bin)
- Metal file (for hardware cloth bin)
- Work gloves
Construction Procedure Using Chicken Wire
- Fold back 3 to 4 inches of wire at each end of the cut piece to provide a strong, clean edge that will not poke or snag, and that will be easy to latch.
- Stand the wire in a circle and set it in place for the compost pile.
- Cut the heavy wire into lengths for ties. Attach the ends of the chicken wire together with the wire ties, using pliers.
- Space wood or metal posts around the inside of the chicken-wire circle. Holding the posts tightly against the wire, pound them firmly into the ground to provide support.
Construction Procedure Using Hardware Cloth
- Trim the ends of the hardware cloth so that the wires are flush with a cross wire to get rid of edges that could poke or scratch hands. Lightly file each wire along the cut edge to ensure safe handling when opening and closing the bin.
- Bend the hardware cloth into a circle, and stand it in place for the compost pile.
- Cut the heavy wire into lengths for ties. Attach the ends of the hardware cloth together with wire ties, using pliers.
Wooden Pallet Holding Unit
Old wooden pallets make and excellent holding unit for organic materials. Used pallets are often available free from local businesses.
Materials
- Four wooden pallets (Five pallets if you want a bottom in the unit).
- Nails
- Baling Wire
Tools
- Saw
- Sledge hammer
- Claw hammer
- Work gloves
Construction Procedure
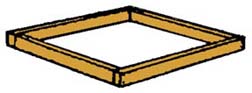
- Nail or wire four pallets together to make a four-sided bin.
- A fifth pallet can be used as a base to allow more air to get into the pile and to increase the stability of the bin.
Concrete-Block Holding Unit
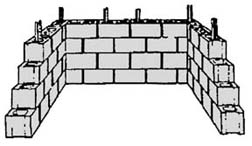
A concrete-block holding unit is sturdy, durable, and easily accessible. If the concrete blocks must be purchased, a concrete-block holding unit may be slightly more expensive to build than the wire-mesh or snow-fence holding units.
Materials
- approximately forty-six concrete blocks for the first bin
- (optional) about thirty-two blocks for a second bin
- wooden or metal posts to stabilize the bin
- work gloves
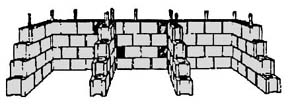
Construction Procedure Using Concrete Blocks
- Place five concrete blocks in a row along the ground at the composting site, leaving about 1/2 inch between each block to let in air.
- Place four concrete blocks in another row along the ground perpendicular to, and at one end of, the first row, forming a square corner, leave about 1/2 inch between each block.
- In the same way, place four concrete blocks at the opposite end of the first row to form a three-sided enclosure.
- Add a second layer of blocks, staggering them to increase stability and leaving about 1/2 inch between each block. There should be a layer of four concrete blocks on each of the three walls of the enclosure.
- Add a third layer of blocks, again staggering them to increase stability, with five blocks across the back of the enclosure and three on each side.
- The last, and top, layer should have four blocks across the back and three on each side.
- To make the bin more stable, drive wooden or metal posts through the holes in the blocks.
- (Optional) If you wish to decrease your composting time, build a second bin next to the first, so that the wastes in one can mature while you add wastes to the other. Use one side wall of the first bin so that you only need to build two additional walls.
Garbage-Can Composter

A garbage-can composter is inexpensive and easy to build. However, the disadvantage of a garbage can composter is that the materials within the unit are difficult to turn.
Materials
- garbage can with cover
- coarse sawdust, straw, or wood chips
Tools
- drill
- pitch fork, shovel, or compost turner
- work gloves
Construction Procedure Using Garbage-Can
- Drill three rows of holes 4 to 6 inches apart all around the sides of the garbage can. Then drill several holes in the base of the garbage can. The holes allow air movement and the drainage of excess moisture.
- Place 2 to 3 inches of dry sawdust, straw, or wood chips in the bottom of the can to absorb excess moisture and let the compost drain.
Turning Units
As the name implies, turning units are designed to allow mixing of organics periodically during the composting process. The most commonly used types of turning units are three-bin turning units and barrel composters. Like holding units, each bin of a three-bin turning unit should be approximately 3 ft. X 3 ft. X 3 ft. in size to provide good aeration throughout the composting organics.
The following are detailed plans for do-it-yourself construction of some commonly used turning units. Again, feel free to modify the plans to fit your purpose. Sources of several manufactured units are listed in the appendix.
Wood and Wire Three-Bin Turning Unit
If space permits and if you need more space for the annual supply of organic materials, a three-bin turning unit is recommended. It provides more space for composting than a single unit. Organics can be turned from one unit to the next, with each of the three units at different stages. In other words, bin 1 can be used for fresh incoming organic materials, bin 2 for half-done compost, and bin 3 for finished compost. The materials are turned periodically within each bin and shifted from one bin to the nextwhen they reach the desired level of decomposition.
Materials
- 4–12-foot lengths of pressure-treated 2 X 4 lumber
- 2–10-foot lengths of pressure treated 2 X 4 lumber
- 1–10-foot length of construction-grade 2 X 4 lumber
- 1–16-foot length of 2 X 6 lumber
- 6–8-foot lengths of 1 X 6 lumber
- 1–22-foot length of 36-inch-wide 1/2-inch hardware cloth
- 16d galvanized nails (2 pounds)
- poultry wire staples (250)
- 12–1/2-inch carriage bolts 4-inches long with washers and nuts
- one quart wood preservative or stain
Optional Materials – for lids
- 1-4 X 8 ft. sheet of 1/2-inch exterior plywood
- 1–4 X 4 ft. sheet of 1/2-inch exterior plywood
- 1–3-inch zinc-plated hinges
- twenty-four 3/16-inch galvanized steel bolts with washers and nuts
Construction Procedure
- Cut two 31 1/2-inch pieces and two 36-inch pieces from a 12-foot length of pressure-treated 2″ X 4″ lumber. Butt-joint and nail the four pieces into a 35-inch X 36-inch “square”. Repeat, building three more frames with the remaining 12-foot length of 2″ X 4″ lumber.
- Cut four 37-inch length of hardware cloth. Fold back the edges of the wire 1 inch. Stretch the pieces of hardware cloth across each frame. Make sure the corners of each frame are square and then staple the screen tightly into place every 4 inches around the edge. The wood-and-wire frames will be dividers in your composter.
- Set two dividers on end, 9 feet apart and parallel to one another. Position the other two dividers so that they are parallel to and evenly spaced between the end dividers. Place the 36-inch edges on the ground. Measure the position of the centers of the two inside dividers along each 9-foot edge.
- Cut a 9-foot piece from each 10-foot length of pressure-treated 2 X 4 lumber. Place the two treated boards across the tops of the dividers so that each is flush against the outer edges. Measure and mark on the 9-foot boards the center of each inside divider.
- Line up the marks, and through each junction of board and divider, drill a 1/2-inch hole centered 1 inch from the edge. Secure the boards with carriage bolts, but do not tighten them yet. Turn the unit so that the treated boards are on the bottom.
- Cut one 9-foot piece from the 10-foot length of construction-grade 2 X 4 lumber. Attach the board to the back of the top by repeating the process used to attach the base boards. Using the carpenter’s square, or measuring between opposing corners, make sure the bin is square. Tighten all the bolts securely.
- Fasten a 9-foot length of hardware cloth to the back side of the bin, with staples every 4 inches around the frame.
- Cut four 36-inch-long pieces from the 16-foot length of 2 X 6 lumber for front runners. (Save the remaining 4-foot length.) Rip-cut two of these boards to two 4 3/4-inch-wide strips. (Save the two remaining strips).
- Nail the 4 3/4-inch-wide strips to the front of the outside dividers and baseboard so that they are flush on the top and the outside edges. Center the two remaining 6-inch-wide boards on the front of the inside dividers flush with the top edge and nail securely.
- Cut the remaining 4-foot length of 2 X 6 lumber into a 34-inch-long piece, and then rip-cut this piece into four equal strips. Trim the two strips saved from step 8 to 34 inches. Nail each 34-inch strip to the insides of the dividers so that they are parallel to, and 1-inch away from the boards attached to the front. This crates a 1-inch vertical slot on the inside of each divider.
- Cut the six 8-foot lengths of 1 X 6 lumber into eighteen slats, each 31 1/4 inches long. Insert the horizontal slats, six per bin, between the dividers and into the vertical slots.
- (Optional) Cut the 4 X 8-foot sheet of exterior plywood into two 3 X 3-foot pieces. Cut the 4 X 4-foot sheet of exterior plywood into one 3 X 3-foot piece on one of the three bins, and attach each to the back, top board with two hinges.
- Stain all untreated wood.
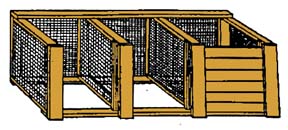
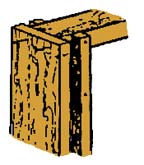
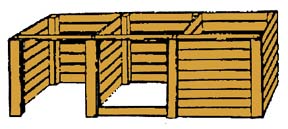
Wooden Three-Bin Turning Unit
This turning unit is a permanent, sturdy structure, but it may be difficult to space the posts to the exact dimensions illustrated. Before cutting the removable slats that slide into the grooves at the front of each bin, cut one slat and check for proper fit in each bin.
Materials
(All lumber should be pressure treated)
- 8–4-inch x 4-inch x 6-foot posts
- 7–1-inch x 6-inch x 12-foot back slats
- 14–1-inch x 6-inch x 4-foot end/side slats
- 4–1-inch x 6 inch x 4-foot fronts
- 14–1-inch x 6 inch x 46 1/4-inch dividers
- 24–1-inch x 6-inch x 42 13/16-inch (approximate) front slats [Note: before cutting all the front slats, cut one and check for proper fit in each bin.]
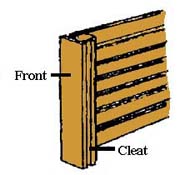
- 4–1-inch x 1(+)-inch x 4-foot cleats, rip cut from one four-foot 1 x 6 (the cleats are retainers for slats)
- 8d galvanized deck nails or deck screws
- one tube exterior construction adhesive
- (optional) one 1-inch x 6-inch x 12-foot top rail
Tools
- post hole digger
- hammer
- saw
- tape measure
- drill
Construction Procedure Using Wooden Slats
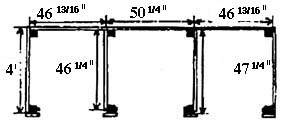
- On level ground, set the eight posts as shown below using a post hole digger. (The posts are shown as darkened squares.) Place each post 2 feet into the ground. Be sure all posts are plumb (perpendicular to the ground). The top of each post should be at the same distance above the ground (48 inches).[Note: Dimensions given for the back are included to assist in post spacing.]
- Nail (or screw) on the back and side slats and dividers (pre-drill all holes to prevent splitting). Use adhesive on all joints. The bottom slats should be at ground level. Leave 1 1/2-inch (horizontal) spaces between slats. Note that the ends of the dividers should come out to 1 inch behind the front of the front posts, as shown in the illustration above.
- Install the fronts and cleats, as shown for one of the center divider posts shown.
- After the front slats have been sized and cut, slide them into place between the fronts and cleats as shown in the completed bin illustration above.
- (Optional) Nail the top rail to each front post, as shown in the completed bin illustration above. Do not use adhesive, and do not drive the nails in fully, as they will be removed to allow access to the slats. The top rail is suggested to prevent the front posts from moving laterally. Another option to discourage this is to use 4-inch x 4-inch x 7-foot posts and embed them one foot deeper.
Concrete-Block Three-Bin Turning Unit
A concrete-block turning unit looks like three concrete-block holding units in a row. It is sturdy and, if used concrete blocks are available, it is inexpensive to build.
Materials and Tools
- eighty-six concrete blocks
- four concrete half-blocks
- work gloves
- wooden or metal posts to stabilize the bin
Construction Procedure Using Concrete Blocks
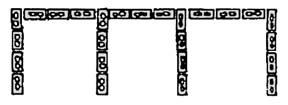
- Place twenty-five concrete blocks along the ground at the composting site as shown in the illustration below. Leave about 1/2 inch between each block to let in air.
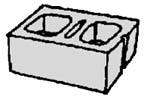
The illustration above shows a concrete block with a central slit that makes it easy to split into two half blocks. Score each side of the block in the plane of the slit with a chisel. Then use the chisel and a hammer to split the block along the score.
- Add a second layer of blocks, staggering them to increase stability. Using the turning unit illustration above as a guide, place ten full and two half-blocks along the back wall, and three blocks along each side. Leave about 1/2 inch between each block.
- Add a third layer of blocks, again staggering them to increase stability. Place twelve blocks across the back ofthe enclosure and three blocks on each side.
- The last, and top, layer should have ten full and two half-blocks across the back and two full blocks along each side.
- To make the unit more stable, drive wooden or metal posts through the holes in the blocks.
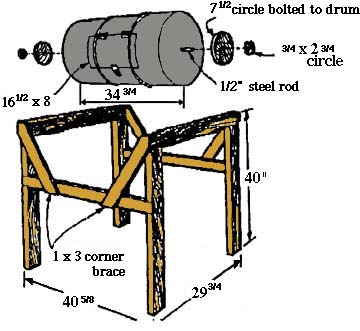
Barrel Composter
The advantage of a barrel composter over other structures is that organic materials can be easily turned simply by rotating the barrel. A barrel composter is relatively easy to construct using the following plan. Several manufactured barrel composters are also commercially available.
Materials
- one 55-gallon drum (composter)
- two 2 3/4″ dia. x 3/4″ (bearings) white
- 4, 40 x 2 x 4″ (frame uprights)
- 4, 29 3/4 x 2 x 4″ (frame horizontal)
- 2, 40 5/8 x 1 x 3″ (cross braces) white pine
- 4, 23 3/4 x 1 x 3″ (corner braces) white pine
- 2, 7 1/2″ dia. x 3/4″ (bearings) white pine
- 2, 1 l/2 x 2″ hinges
- 1 small hasp
- 1, 1/2 x 40 1/2″ steel rod
- 1, 2 1/4 x 11/4″ stove bolts
- 28, 1 1/2” #10 wood screws
- 1 pint of flat black paint.
The steel axle rod fits into 1/2-inch holes in the horizontal two-by-fours. Wooden bearing disks bolt onto the drum with four 1 1/4-inch stove bolts.
For uniform compost, the barrel is rotated several times whenever new material is added. Air holes are drilled opposite the opening.
Construction Procedure
- Start by obtaining a good 55-gallon drum preferably one that has not had any toxic chemicals in it. Paint barrels are a good choice, as they already have a protective coating of paint inside. If not already painted, adding a protective coating is a good idea.
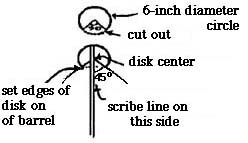
- Drill a 1/2-inch hole in the exact center of both ends of the barrel to accommodate the 1/2-inch steel rod. (Refer to the illustration for making a simple tool to locate centers.) Hold the rounded end of the gauge anywhere along the circumference and scribe a line on the approximate center. Move the gauge 90 degrees and scribe another line. The intersection of these lines will be the exact center.
- Next scribe the lines for the opening in the barrel making sure to round the corners slightly. Drill a 1/4-inch hole somewhere along one of the lines to start the saber saw. If your barrel has ribs, as most do, you will have to cut a 1-inch vee notch on each rib to facilitate opening the door. Attach the hinges and the hasp to the barrel and lid using 1-by-1/4-inch stove bolts.
- From 3/4-inch white pine, cut two circles 7 1/2 inches in diameter and two circles 2 3/4 inches in diameter. Drill a 1/2-inch hole in the center of each and apply glue to the 2 3/4-inch circles. Glue the 2 3/4-inch circles to the 7 1/2-inch circles. This can be done easily if the circles are temporarily slipped over the 1/2-inch steel rod and clamped. After the glue has dried, remove the disks, insert the rod through the barrel, and assemble as shown in the illustration, using four 1 1/4-by-1/4-inch stove bolts in each.
- To build the support frame, cut the 2-by-4’s to length and, using a corner lap joint, assemble with two 1 1/2-inch #10 wood screws in each joint. The uprights will also have to be dadoed 23 inches from the bottom to accept a 1-by-3-inch board. To make a corner lap joint, simply remove one-half the thickness of the stock to a length comparable to the width of the stock on both ends of all pieces.
- Half-inch holes to accommodate the rod will have to be drilled in the exact center of the top horizontal pieces before assembling the top portion of the support frame. Slip the 1/2-inch steel rod, with barrel attached, through these holes and insert the cross members into the dadoed uprights. Fasten with 1 1/2-inch #10 wood screws. Next cut the 1-by-3-by-23 1/4-inch piece at 45-degree angles at both ends, and attach with 1 1/2-inch #10 wood screws across corners as shown in the illustration.
- Drill several rows of 1/4-inch holes along the bottom of the barrel exactly underneath the door opening to eliminate excess moisture. Paint the unit a flat black color to help absorb heat.
Heaps
Heap composting is simply composting without a structure. Organic materials are added to the pile as they become available. For best decomposition; the heap should not exceed three feet in height, but the length can vary according to the materials available. When a sufficient size is reached, it is best to start another heap for fresh materials while allowing the original heap to decompose with the help of occasional turning.
Pit Composting
Pit composting refers to composting in shallow pits dug in the ground as opposed to above-ground structures. The pit is dug approximately 2 feet deep, 3 feet wide, and any length. The walls of the pit can be lined with treated wood, brick, or masonry, or it may be left unlined if the surrounding soil packs well and remains firm. If construction materials are used, the walls may extend above ground level.
Pit composting does not provide good aeration and occurs primarily under anaerobic conditions (in the absence of good air flow). Therefore, the composting process takes longer in pits than in above-ground structures.
Plastic Bag Composting
Plastic bag composting is perhaps the simplest of all composting methods requiring no structure other than a black plastic garbage bag.
The bags should be 30 to 40 gallon in size and at least 3 ml. in thickness. This size bag should hold approximately 3 bushels of organic materials.
For best decomposition, try to place a combination of both brown and green organic materials in the bag. To each bag add 1 cup of ammonium nitrate and about 1/4 cup of hydrated lime (in this case lime is used to counteract the acidity that will occur under anaerobic conditions within the bag). Then add about a quart of water, close the bag tightly and set it aside for six months to a year. You should not have to turn the mixture or add water after closing the bag. If possible, set bags in a sunny spot where they can absorb heat. In the winter, move bags to a heated garage or basement.
Plastic bag composting is convenient, but, like pit composting, the process occurs mainly under anaerobic conditions and much slower than composting in well-ventilated structures.
The information given herein is for educational purposes only. Reference to commercial products or trade names is made with the understanding that no discrimination is intended and no endorsement by the Texas AgriLife Extension Service is implied.
Educational programs of the Texas AgriLife Extension Service are open to all people without regard to race, color, sex, disability, religion, age, or national origin.
Publication Revised February 2009